Way back in 1981 a genius named Malcolm Evans managed to coax a 3D game out of a Sinclair ZX81 (an 8-bit micro with a Z80 CPU and 1Kb of RAM). It randomly generated mazes and used low resolution “character block” graphics to display them in 3D complete with a monster that chased you. The game was called 3D Monster Maze and it really was amazing to see back then and remains an impressive feat of coding.
Maze generation algorithms are a fun rabbit hole to go down and rendering the view using similar block graphics in a console window is a kinda fun and neat trick and so I figured this might make for a neat little project.
The source code for this project can be found on GitHub and you can see the video attached to this post.
We’re going to take a fairly functional approach to this code. C# isn’t perfect as a functional language, unsurprising given its roots, but its passable and I find this kind of project lends itself well to a functional approach. If anything its always interesting to explore an approach that is different (for example rather than use interfaces, such as IAlgorithm, I’ve used function signatures here).
If you want to spin it up and give it a go then I recommend setting your terminal to 100x48 characters in size as a minimum - this is the size of the canvas we use to render the maze. The keys are:
Up - move forwards Down - move backwards Left - rotate left Right - rotate right M - show the overhead map Escape - quit the game
Maze generation
We’re going to explore two maze generation algorithms and these can be found in the Algorithms sub-folder of the solution.
Recursive Backtracking
Our first algorithm is possibly the simplest maze generation algorithm you can implement. It has the following flow:
- Prefill the maze grid so that its entirely “solid”
- Choose a random starting point in the grid and mark it as “empty”
- Pick a random direction to an adjacent cell that hasn’t yet been visited and mark this new cell as “empty”
- If we can’t pick a new direction because all the cells have been visited then back up the chain until you reach a cell that has new directions for us to move in.
- Repeat until all cells have been visited - you can recognise this because the back up will go all the way to the starting cell and it will have no new directions to go in.
A worked example is the best way to illustrate this. In the below the blue represents the current path accumulated across the recursion with the light blue being the tip (or current cell) of the path. Dark grey are unvisited cells while white cells are cells that have been visited and completed. At the end of the animation you can observe the path completely unwinding back to the starting point:
![]()
As an aside this animation has been created by a tool called MazeGenerationAnimationGenerator (a bit of a mouthful I realised after creating it) that uses the observer approach we’ll discuss later to inspect the steps of the maze generation and generate a animated GIF file. The same observer approach is used to display the larger maze shown below. This involves over 8000 frames of animation (I hadn’t really built the tool to create animations of this size so it ended up consuming about 18Gb of memory to do this!) and gives a sense of how the number of steps grows significantly as the maze size increases (the 6x6 example shown above is about 130 steps):
The code for the algorithm is really quite simple:
void Walk(MapVector position, ImmutableList<MapVector> path)
{
    path = path.Add(position);
    observer(map, path);
    foreach(var direction in Directions.All.OrderBy(_ => random.Next()).ToArray())
    {
        var next = position + Directions.Vector[direction];
        var oppositeDirection = Directions.Opposite[direction];
        if (next.WithinBounds(width,height) && map[next.y,next.x] == Direction.None)
        {
            map[position.y,position.x] |= direction;
            map[next.y, next.x] |= oppositeDirection;
            Walk(next, path);
            if (trackPath) observer(map, path);
        }
    }
}
Walk ( position: new MapVector (x: random. Next(width), :random.Next(height)));
We store our maze as a two-dimensional grid of bitmasked directions, those directions describe which way the player can move within the cell and therefore the inverse of this represents the walls (if a player can’t move in a given direction its because their is a wall there).
Beyond that there’s just a couple of things to note in the code:
- We use some basic bit twiddling to combine the directions.
- When we move to the next cell we mark the current cell as being able to move in the direction of the next cell, and we mark the next cell as being able to move back to our current cell (the opposite direction).
- We randomise the directions on each walk otherwise we’d end up with a maze with a very specific bias:
- We combine a “stay within the bounds of the grid” constraint with our untouched check to prevent the maze generator meandering out of the bounds of the array.
Hunt and Kill
If recursion isn’t your thing (it could be problematic if you have large mazes and limited stack space) then an alternative algorithm is the hunt and kill algorithm. It’s a little more complicated to both explain and implement but here we go.
- Pick a random starting location
- Walk in a random direction to any untouched cell
- Keep walking randomly until there are no untouched cells to move to
- Now “hunt” - search the maze for an untouched cell that is next to a touched cell then start walking again (step 2)
- Repeat until hunt cannot find a cell, at which time the maze is done
I’m never quite sure where the kill comes from in the name, perhaps it was added to make it sound cool. Walk and hunt doesn’t have quite the same ring I guess.
Again a worked example is shown below:
And again the same algorithm working on a bigger maze - this took far fewer frames, just over 4000, and consequently less memory (partly because there is no backtracking but also because the hunt steps are not illustrated):
The code is a little more involved here, I don’t think its particularly complicated but there are a number of moving parts and we introduce some helper functions so we don’t repeat ourselves as hunt and walk share a number of common components. Firstly we have our core loop that basically maps onto the steps above:
var position = new MapVector(random.Next(width), random. Next(height));
while (position.IsValid)
{
    observer (map, ImmutableList<MapVector>.Empty);
    position = Walk(position);
    if (Iposition. IsValid) position = Hunt();
}
Simple enough! Then we have our walk method:
MapVector Walk(MapVector position)
{
    var possibleDirections = GetPossibleDirections(position,LookingFor.Untouched);

    if (possibleDirections.Any())
    {
        var direction = possibleDirections.MinBy(_ => random.Next());
        return UpdateMap(position, direction);
    }

    return MapVector.Invalid;
}
This makes use of a simple helper method, GetPossibleDirections, that can return an array of directions we can move in based on whether we are looking to move to an untouched (during walk) or touched (during hunt) cell:
Direction[] GetPossibleDirections(MapVector position, LookingFor lookingFor)
{
    bool IsValid(Direction value) =>
        lookingFor == LookingFor.Touched ? value != Direction.None : value == Direction.None;
    var cx = position.x;
    var cy = position.y;

    var north = cy > 0 && IsValid(map[cy - 1, cx]) ? new[] {Direction.N} : new Direction[] { };
    var east = cx < (width - 1) && IsValid(map[cy, cx + 1]) ? new[] {Direction.E} : new Direction[] { };
    var south = cy < (height - 1) && IsValid(map[cy + 1, cx]) ? new[] {Direction.S} : new Direction[] { };
    var west = cx > 0 && IsValid(map[cy, cx - 1]) ? new[] {Direction.W} : new Direction[] { };
    var possibleDirections = north.Concat(east).Concat(south).Concat(west).ToArray();
    return possibleDirections;
}
Finally if we manage to walk to an untouched cell then we update the map and return the new position, we do this using another little helper function called UpdateMap:
MapVector UpdateMap(MapVector mapVector, Direction direction)
{
    var nextPosition = mapVector + Directions.Vector[direction];
    var oppositeDirection = Directions.Opposite[direction];
    map[mapVector.y, mapVector.x] |= direction;
    map[nextPosition.y, nextPosition.x] |= oppositeDirection;
    return nextPosition;
}
This is very similar to what we saw in the recursive backtracker - when we open up a direction we open it up in both directions.
If walk can’t move to an untouched position then we enter our hunt phase. Hunt essentially iterates over our array and looks for a touched cell with an untouched cell next to it:
MapVector Hunt()
{
    for (var mapY = 0; mapY < height; mapY++)
    {
        for (var mapX = 0; mapX < width; mapX++)
        {
            if (map[mapY, mapX] != Direction.None) continue;

            var position = new MapVector(mapX, mapY);
            var possibleDirections = GetPossibleDirections(position, LookingFor.Touched);
            if (possibleDirections.Any())
            {
                var direction = possibleDirections.MinBy(_ => random.Next());
                UpdateMap(position, direction);
                return position;
            }

        }
    }

    return MapVector.Invalid;
}
We’re using the same helpers as walk but we reverse the “polarity”, so to speak, when we look for possible directions.
And that’s it. If hunt fails to find a valid position then we’re done and our maze is generated.
Projecting the maze
I find it fascinating to watch the two algorithms side by side. The recursive back tracker feels really quite random in the route it takes whereas the hunt and kill algorithm broadly fills the maze in from top to bottom due to how our hunt for loops are indexed.
In any case at the end of either algorithm we have a two dimensional array that tells us in which direction you can move from any given cell. However the maze in 3D Monster Maze is constructed on a grid from square blocks and so it would be handy for us to project our algorithm output into this format. Despite the code being quite simple strangely I found this the most mind warping part of the project! The code for this projection can be found in the TransformToGrid method in the MapFactory class:
public static ImmutableArray<ImmutableArray<Block>> TransformToGrid(Direction[,] map)
{
var topRow = Enumerable.Repeat(Block.Solid, Width * 2 + 1).ToList();
var rows = new List<List<Block>>();
rows.Add(topRow);
for (var y = 0; y < Height; y++)
{
var row1 = new List<Block>();
var row2 = new List<Block>();
// our rows always start with a wall otherwise the maze would be open
// because we are checking eastwards we don't need to terminate with a
// wall, the maze generation algorithm itself terminates and all last columns
// will have no eastward openings
row1.Add(Block.Solid);
row2.Add(Block.Solid);
for (var x = 0; x < Width; x++)
{
row1.Add(Block.Empty);
row1.Add((map[y, x] & Direction.E) > 0 ? Block.Empty : Block.Solid);
row2.Add((map[y, x] & Direction.S) > 0 ? Block.Empty : Block.Solid);
row2.Add(Block.Solid);
}
rows.Add(row1);
rows.Add(row2);
}
var result = rows.Select(row => row.ToImmutableArray()).ToImmutableArray();
return result;
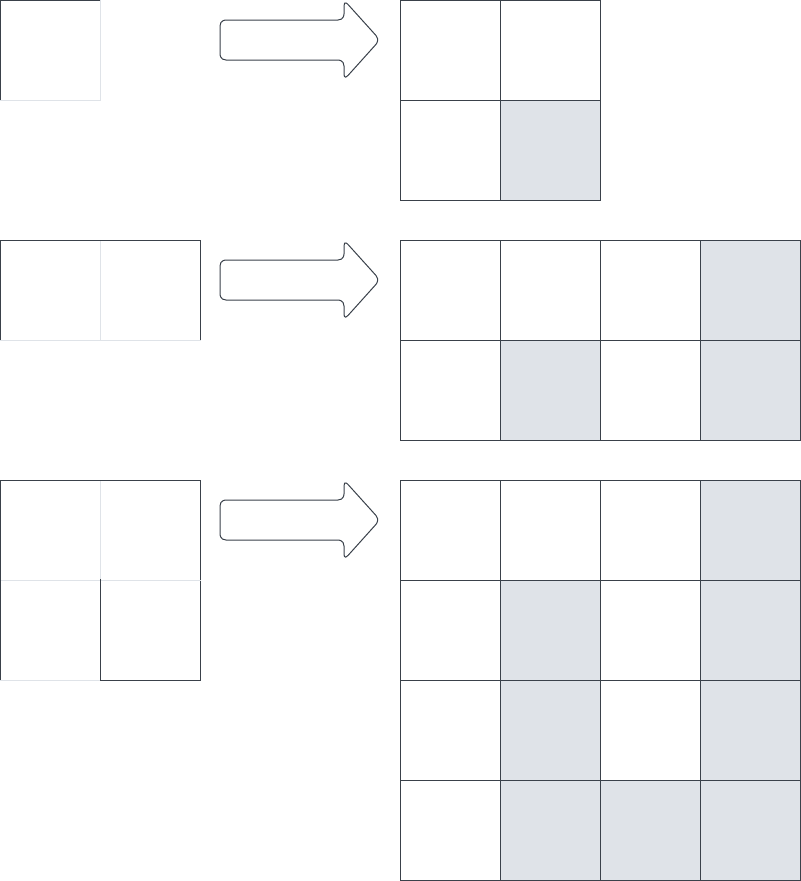
}What we’re doing in this code is essentially turning the walls into blocks. Put another way we’re turning each cell in our source, direction based array, into four cells in our grid based array - two across and two down. We’re only really interested in one horizontal direction and one vertical direction from our direction based array and we’re looking to see if we can move east or south.
Every cell in our source directionally based array becomes an empty cell in our target array and that is our top left cell in the new quadrant. If we can travel east then an empty cell is the next cell on the row, if we can’t travel right then a solid block is the next cell on the row - the top right cell in our quadrant. We then apply the same logic going sout but add the cells to the next row: if we can travel south then we add an empty cell to the next row, if not then a solid cell. The next cell on the row is always a solid block. Hopefully the example below helps make this a little clearer:
Rendering
To render to the console we’re going to make use of the excellent Spectre.Console NuGet package. It contains a class called Canvas that essentially lets us “draw” pixels and it also contains a neat little live update mechanism so that things can update in place.
The title screen
The main feature of the title screen is the retro style pixelated font and the code for this can be found in RetroFont.cs. I’ll cover this in more detail in the Game Engine Development posts but essentially each character is defined as a set of bits and then to render them we look for a set bit and if found draw a pixel. The letter R is defined like this, for example:
new byte[]
{
    0b01110,
    0b10001,
    0b10011,
    0b10101,
    0b11001,
    0b10001,
    0b01110
}
And the key rendering code looks like this:
for (var y = 0; y < Layouts[index].Length; y++)
{
    var row = Layouts[index][y];
    for (var x = 0; x < Width; x++)
    {
        if ((row & (1 << x)) != 0)
        {
            canvas.SetPixel(currentPosition.x + (Width - 1 - x), currentPosition.y + y, color);
        }
    }
}
The overhead view
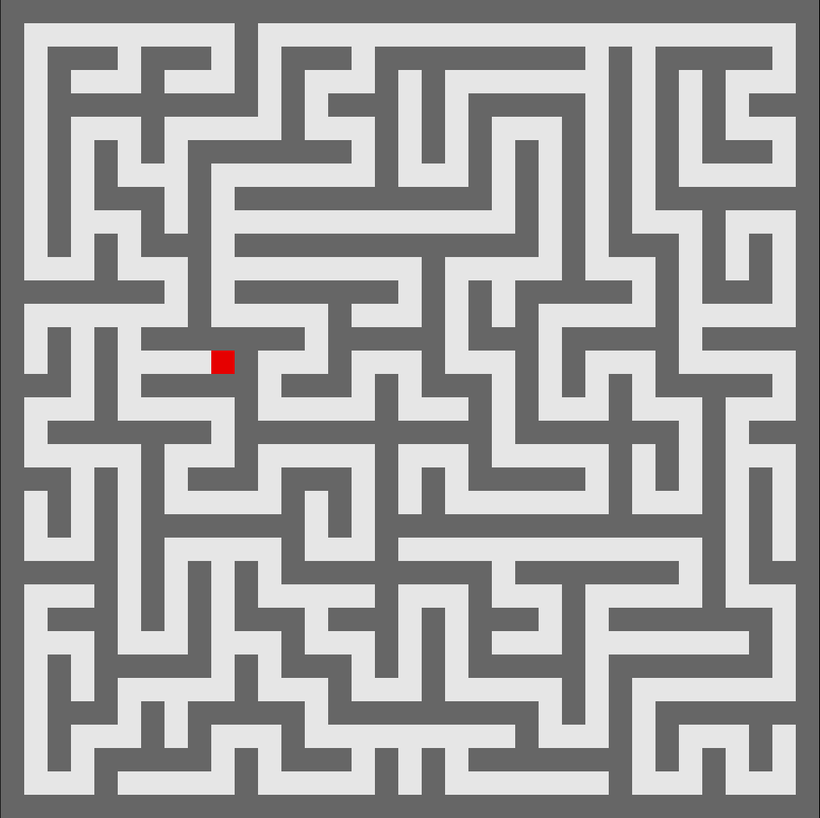
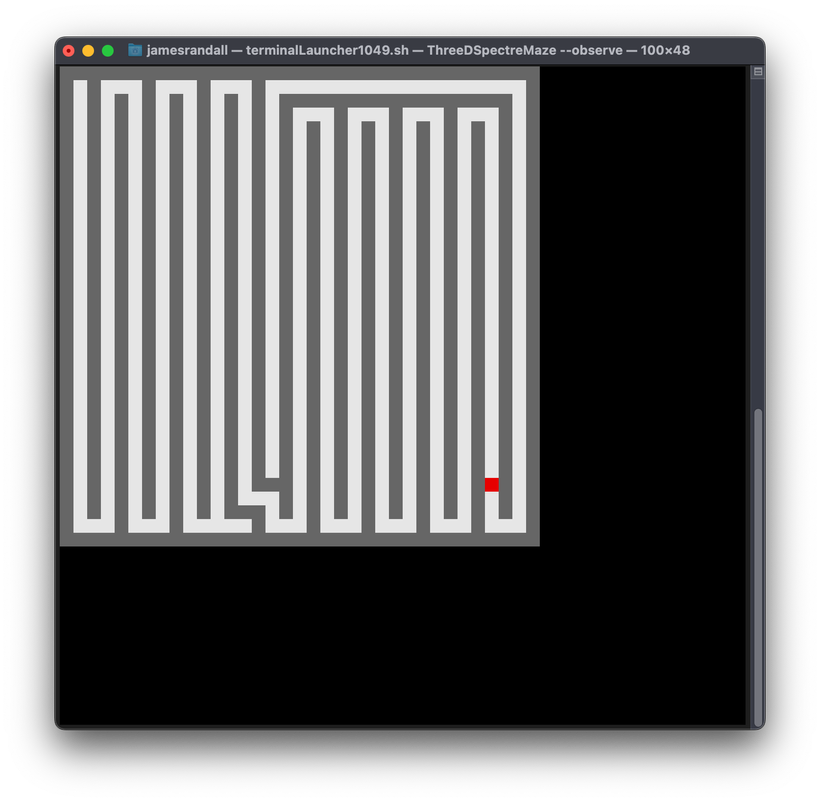
Rendering the overhead view is as simple as iterating over our maze and drawing a light pixel where we have an empty space and a darker pixel where we have a wall. We add the player in as a red square over the top. This code can be found in Renderer.cs:
public static void RenderOverhead(
    Canvas canvas,
    MapVector playerPosition,
    ImmutableArray<ImmutableArray<Block>> map)
{
    DrawRectangle(canvas, 0,0,canvas.Width,canvas.Height,Color.Black);
    for (var y = 0; y < map.Length; y++)
    {
        var row = map[y];
        for (var x = 0; x < row.Length; x++)
        {
            if (playerPosition.x == x && playerPosition.y == y)
            {
                canvas.SetPixel(x, y, Color.Red);
            }
            else
            {
                canvas.SetPixel(x, y, row[x] == Block.Solid ? Color.Grey : Color.White);
            }
        }
    }
}
The 3d view
Before we can render the view we need to grab the slice of the map that the player is looking at based on their orientation. The player can see the edge of the walls alongside them and 5 grid squares in front. The nature of our maze, their are only corridors and no room, mean that the player can never see move than one square either side of them and so we form the player view up from a slice of the map that is 6 grid squares long and 3 wide as shown in the example below:
The code for creating this array can be found in GetPlayerView.cs in Game.cs:
private ImmutableArray<ImmutableArray<Block>> GetPlayerView()
{
    var viewDirection = Directions.Vector[Facing];
    // As we build up the view for the player we need to look at the cells to the left and right of them
    // and the vector for this is based on the direction they are facing
    var strafeDirection = GetPlayerLeftAndRightOffsets();

    var view = new Block[Renderer.DrawDepth][];
    var position = PlayerPosition;
    for (var depth = 0; depth < Renderer.DrawDepth; depth++)
    {
        var leftPosition = position + strafeDirection.left;
        var rightPosition = position + strafeDirection.right;
        view[depth] = new[]
        {
            IsValidPosition(leftPosition) ? _map[leftPosition.y][leftPosition.x] : Block.Solid,
            IsValidPosition(position) ? _map[position.y][position.x] : Block.Solid,
            IsValidPosition(rightPosition) ? _map[rightPosition.y][rightPosition.x] : Block.Solid
        };
        position += viewDirection;
    }

    return view.Select(row => row.ToImmutableArray()).ToImmutableArray();
}
With that done we’re now able to draw the 3D view. To give a sense of perspective the size at which we draw each wall reduces the further away from us it is and the walls next to the player are somewhat special in that we can only see the edges of them. We also want to shade the walls differently the further away from us that they are. We capture this information in another array (which can be found in Renderer.cs):
private static readonly ImmutableArray<(int depth, Color color)> Walls = new []
{
    (2, Color.Black), // walls alongside the player - they can just see the edge of them
    (8, Color.Black),
    (6, new Color(32, 32, 32)),
    (4, new Color(48, 48, 48)),
    (2, new Color(64, 64, 64)),
    (1, new Color(80, 80, 80))
}.ToImmutableArray();
Now, to draw our view, all we need do is walk down the two arrays in parallel drawing our side walls and any facing walls and stoppiig if we reach a block directly in front of us:
public static void Render(Canvas canvas, ImmutableArray<ImmutableArray<Block>> playerView)
{
    DrawRectangle(canvas, 0,0,canvas.Width,canvas.Height,BackgroundColor);
    for (var depth = 0; depth < playerView.Length; depth++)
    {
        var row = playerView[depth];
        var startOffset = Walls.Take(depth).Sum(f => f.depth);
        var endOffset = startOffset + Walls[depth].depth - 1;
        var color = Walls[depth].color;

        DrawSidewalls(canvas, startOffset, endOffset, row, color);
        DrawFacingWalls(canvas, row, startOffset, endOffset);

        // Stop drawing if their is a block in front of us
        if (row[PlayerMiddle] == Block.Solid) break;
    }
}
The actual rendering using our canvas is fairly simple. For the side walls we simply draw increasingly short vertical lines for each line of the wall:
private static void DrawSidewalls(Canvas canvas, int startOffset, int endOffset, ImmutableArray<Block> row, Color color)
{
    for (var drawOffset = startOffset; drawOffset <= endOffset; drawOffset++)
    {
        if (row[PlayerLeft] == Block.Solid) DrawVerticalLine(canvas, drawOffset, color);
        if (row[PlayerRight] == Block.Solid) DrawVerticalLine(canvas, canvas.Width - drawOffset - 1, color);
    }
}
And for the facing walls we draw rectangles, they are slightly tricky to position but again fairly simple:
private static void DrawFacingWalls(Canvas canvas, ImmutableArray<Block> row, int startOffset, int endOffset)
{
    if (row[PlayerMiddle] == Block.Solid)
    {
        // Draw facing wall
        DrawRectangle(
            canvas,
            startOffset,
            startOffset,
            (canvas.Width - startOffset * 2),
            (canvas.Height - startOffset * 2),
            HorizontalWallColor
        );
    }

    if (row[PlayerLeft] == Block.Empty)
    {
        // Drawing facing wall of corridor to the left
        DrawRectangle(
            canvas,
            startOffset,
            (endOffset + 1),
            (endOffset - startOffset + 1),
            (canvas.Height - endOffset * 2 - 2),
            HorizontalWallColor
        );
    }

    if (row[PlayerRight] == Block.Empty)
    {
        // Draw facing wall of corridor to the right
        var wallWidth = (endOffset - startOffset);
        DrawRectangle(
            canvas,
            (canvas.Width - startOffset - wallWidth - 1),
            (endOffset + 1),
            wallWidth + 1,
            (canvas.Height - endOffset * 2 - 2),
            HorizontalWallColor
        );
    }
}
And that’s it. That will render our maze in delightyfully chunky three dimensions.
Bringing it all together - the game loop
We bring all this rendering together in a super simple game loop that also lets the player move around the maze in a class called Game which, go figure, can be found in a file called Game.cs. The key part of the class is the Run method shown below:
public void Run(Canvas canvas)
{
    var isOverhead = false;
    AnsiConsole.Live(canvas).Start(ctx =>
    {

        var quit = false;
        while (!quit)
        {
            if (isOverhead)
            {
                Renderer.RenderOverhead(canvas, PlayerPosition, _map);
            }
            else
            {
                Renderer.Render(canvas, GetPlayerView());
            }
            ctx.Refresh();
            var key = Console.ReadKey().Key;
            switch (key)
            {
                case ConsoleKey.UpArrow: Move(MovementDirection.Forwards); break;
                case ConsoleKey.DownArrow: Move(MovementDirection.Backwards); break;
                case ConsoleKey.LeftArrow: RotateLeft(); break;
                case ConsoleKey.RightArrow: RotateRight(); break;
                case ConsoleKey.M: isOverhead = !isOverhead; break;
                case ConsoleKey.Escape: quit = true; break;
            }
        }
    });
}
The most notable part of this is the use of AnsiConsole.Live which allows us to update our canvas in place. Without this each render of the canvas would cause the console to scroll as normal behaviour is to append console output. Its a really neat feature of Spectre and you can do some super cool stuff with it!
But otherwise all we are doing here is responding to key presses and updating the display and that’s it: a simple maze game. Well. Its not much of a game, all you can do is wonder around. Interactive experience perhaps?