The source code for this part can be found on GitHub here.
While I’m still working on C# Wolfenstein (and the AI is about half complete) I’ve been hankering to write some F# (C# has been fine but I do find it rather inelegant and, well, tedious) and so I broke out Rider this weekend and created a new solution FSharpDoom.sln. At some point I was always going to have a crack at the original Doom - to this day it remains my favourite FPS. I can happily play it and its sequel for hours.
First and foremost the aim with this project is to have fun. Secondly I want to use the original rendering techniques - so no OpenGL here (well other than that I’m using it as a fairly portable way of rendering a byte array to the screen). We’re going to be writing to a screen as represented by an array of bytes and using a binary space partition (BSP) tree to perform front to back rendering.
While I’ve spent some time researching how the original game worked I’m blogging about this, and implemneting it, fairly cold to things - so it might take me quite a while between blog posts and we might meander around a bit. And I’m definitely expecting this to be a fair bit more work, and a lot more complex, than Wolfenstein - their is a big leap in complexity between Wolfenstein and Doom. In fact the more you learn the more impressive is the rapid progress Carmack made.
Setting up the screen
I’m targetting desktop first with Doom (I may swing back round and see if I can get it working in a browser too - intrigued to see if I can use Blazor via FSBolero) and I’ve taken the same approach I took with F# Wolfenstein. Basically I create a byte array to represent the screen, 4 bytes per pixel (red, green, blue, alpha - alpha basically unused), which is updated on each frame. An OpenGL texture is then created from this byte array and rendered onto a rectangle made up of two triangles.
I make use of OpenGL through Silk.NET - a pretty handy cross-platform NuGet package for low-level graphics and sound work.
All in if you want to work on games using “retro” techniques this is a pretty simple way of going about it.
Loading basic assets
Ok. So this is proving much easier than Wolfenstein - helped in part by its infamous WAD (Where’s All the Data) file being well documented and because Doom was designed from the outset to be easily modifiable, a big part of that being the file formats. Untangling Wolfenstein felt like groping round in a gloomy fog compared to the clarity that is Doom. If you’re interested in the format you can follow along as I work through it here or take a sneak peak ahead.
I’m expecting this to be about the only thing that is simpler about Doom than Wolfenstein!
In any case I’ve started with something both basic, quick and rewarding: unpacking a zombie soldier sprite and the required palette that we can then render on the screen. I always like to try and find things that give me fast feedback - keeps things fun.
The code for all the below can be found in the Assets/Loader.fs file.
The WAD file is made up of a series of “lumps” - the file itself begins with a basic identifier (IWAD or PWAD - the latter represents a patch, the former is what we are dealing with here), the number of lumps, and a pointer to an index of the lumps. When I say pointer in the context of the WAD I mean an integer that represents the byte index something starts at.
The directory itself is pretty simple and consists of series of entries each of which has a pointer to the lump in the file, the size of the lump and the name of the lump (note that the name is a null terminated string with a maximum length of 8 characters). This is all pretty easy to decode:
let load () =
  let lumpSize = 4 + 4 + 8
  let wad = System.IO.File.ReadAllBytes("Assets/DOOM1.WAD")
  let fileType = getString 0 4 wad
  if fileType <> "IWAD" then raise (WadLoaderException "Only IWAD files are supported")
  let numberOfLumps = getInt32 0x4 wad
  let directoryOffset = getInt32 0x8 wad
  let lumps =
    {0..numberOfLumps-1}
    |> Seq.map(fun index ->
      let entryOffset = directoryOffset + index * lumpSize
      { Offset = getInt32 entryOffset wad
        Size = getInt32 (entryOffset+0x4) wad
        Name = getString (entryOffset+0x8) 0x8 wad
      }
    )
    |> Seq.toArray
If you were to inspect the lumps array you’ll see something like this:
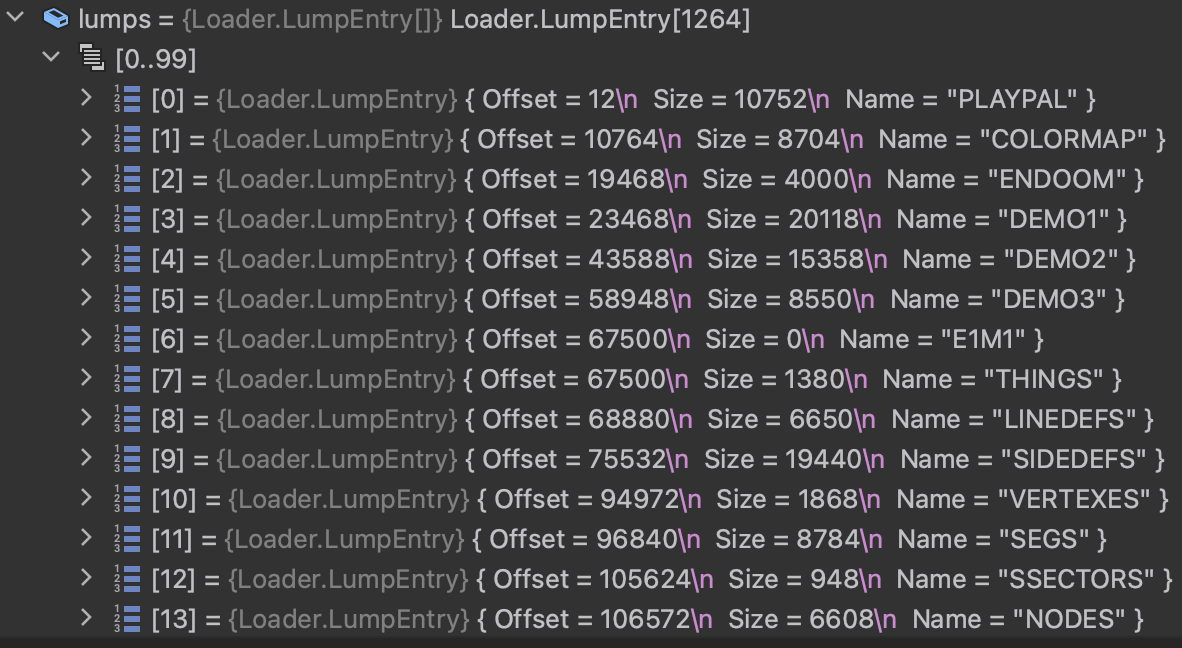
There are two specific lumps we are interested in to get our sprite rendered. The first is one we can see in the screenshot: PLAYPAL. The images in Doom basically contain an index into a 256 color palette and these palettes are defined in the PLAYPAL lump. Each palette is 768 bytes in size (byte for red, byte for green, byte for blue * 256 entries) and the game ships with 14 palettes (10752/768 = 14). That given these are pretty simple to load:
let loadPalettes (wad:byte array) lump =
let paletteEntries = 256
let paletteSize = paletteEntries * 3
let numberOfPalettes = lump.Size / paletteSize
{0..numberOfPalettes-1}
|> Seq.map(fun paletteIndex ->
let offset = lump.Offset + (paletteIndex * paletteSize)
{ Colors =
{0..paletteEntries-1}
|> Seq.map(fun entryIndex ->
let entryOffset = offset + entryIndex * 3
{ R = wad[entryOffset] ; G = wad[entryOffset+1] ; B = wad[entryOffset+2] ; A = 0xFFuy }
)
|> Seq.toArray
}
)
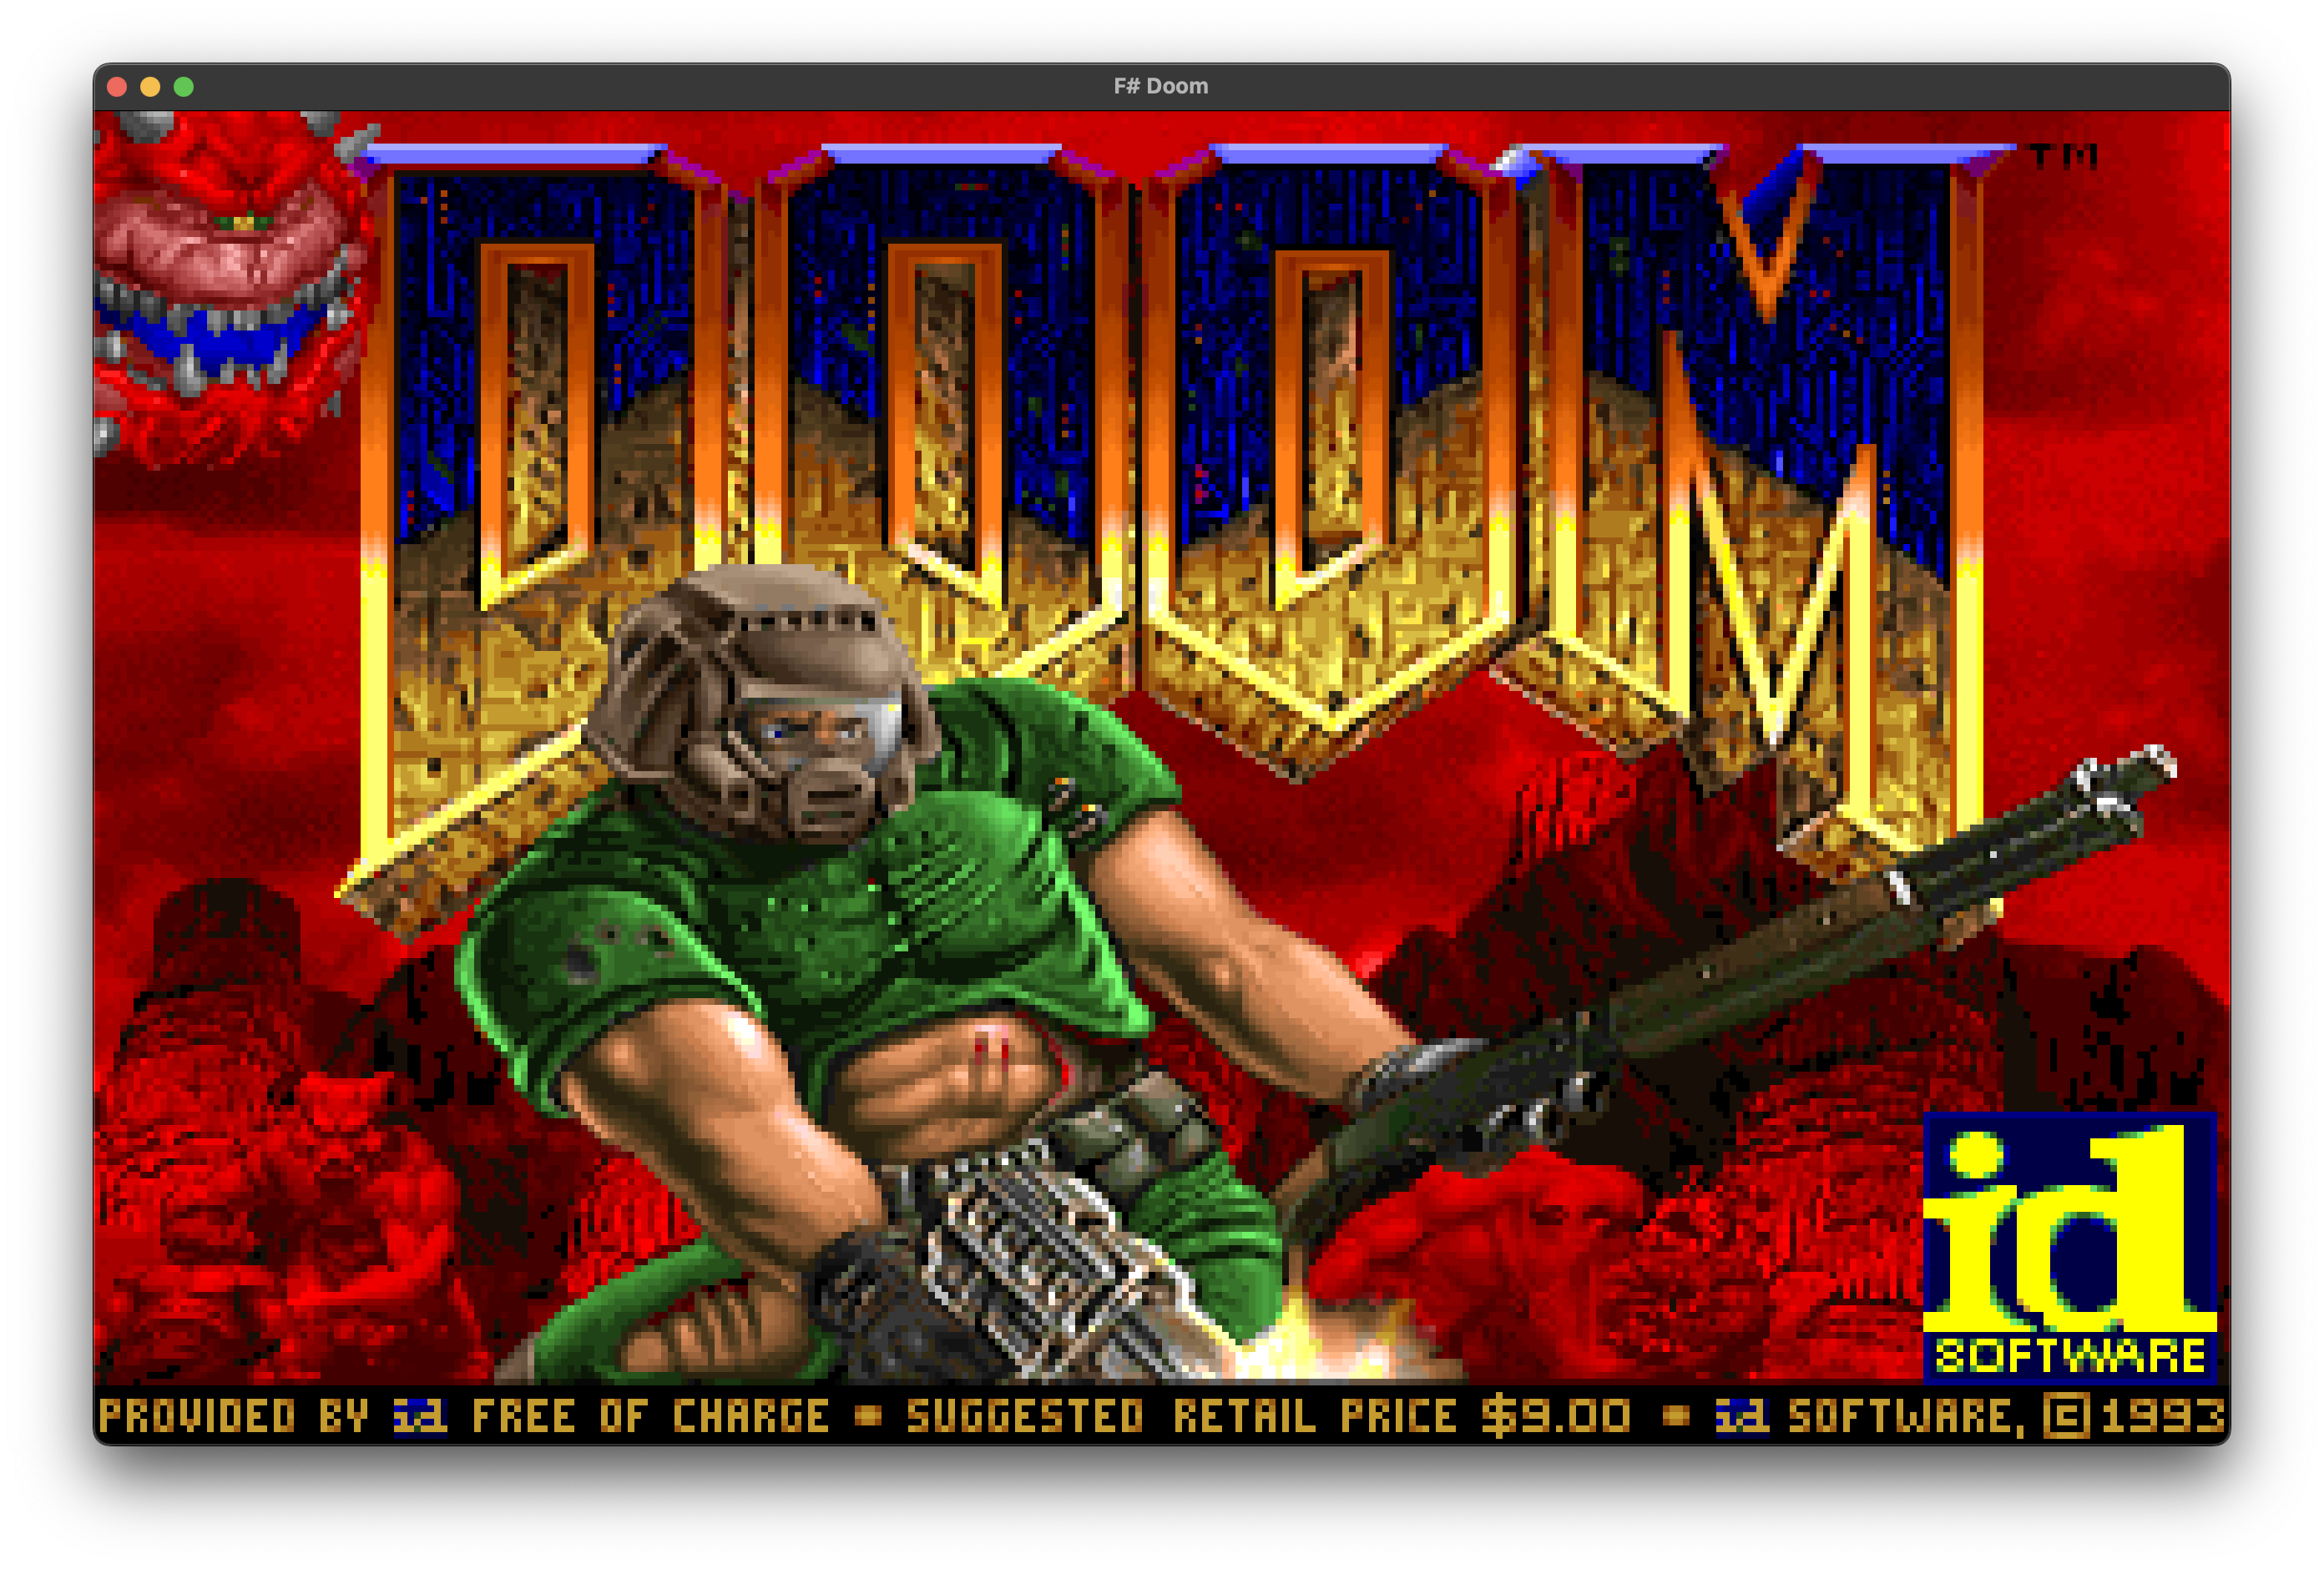
|> Seq.toArrayThe second item we need to display a sprite is the name of a sprite. I’ve using the lump named TITLEPIC for this - its the infamous title screen which, if things work out, we’ll see later.
Sprites in Doom are stored in a column-wise format that basically allows the transparent pixels to be excluded from the data, saving memory, and drawn optimally (I assume - I’ve not yet looked at the Doom code) by the renderer.
The format begins with a header comprised of 4 words (16 bit ints): width, height, left offset, top offset. Width and height are obvious - we’ll come back to the offset later I’m sure.
As the columns exclude transparent pixels they are variable numbers of bytes long and so following the header their is a set of pointers to the columns - we have one pointer for each column (so a 32 pixel wide image will have 32 columns, 32 column pointes). These pointers are relative to the start of the image in the WAD (and not the absolute position in the WAD) and so to locate them we need to add on the offset of our lump.
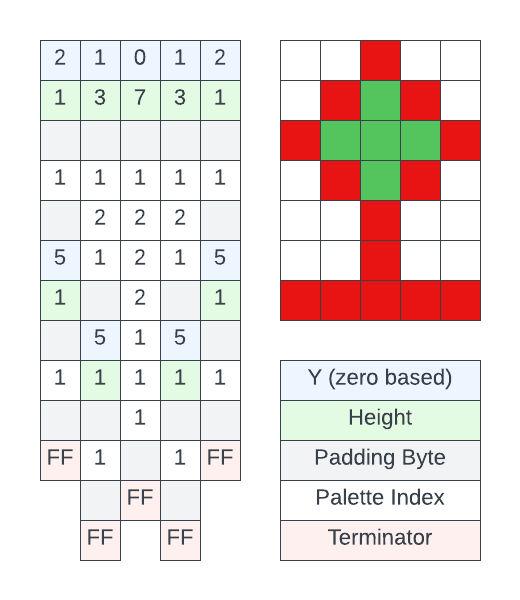
Each column is then comprised of a series of posts. A post begins with a row index (where the row starts vertically in the image - the y) followed by the height of the post, a padding byte, then the palette indexes, and finally another padding byte. The column is then terminated with a 0xFF byte (posts are never longer than 128 pixels).
I’ve attempted to show how this maps out in the diagram below:
For now I’ve unpacked these posts so that we end up with a more regular array of pixels (or at least palette indexes). I’ve made this an int type with -1 representing a transparent pixel and >= 0 representing a palette index. I’ve not used an option type as in the rendering code I’m going to use unmanaged code and you can’t use NativePtr with a managed type such as Option.
The code for all this is as follows:
let loadDoomImage wad lump =
  let offset = lump.Offset
  let width = wad |> getInt16 offset |> int
  let height = wad |> getInt16 (offset+2) |> int
  let left = wad |> getInt16 (offset+4) |> int
  let top = wad |> getInt16 (offset+6) |> int

  let columnIndexes =
    {0..width-1}
    |> Seq.map(fun ci ->
      offset + (getInt32 (offset+8 + 4*ci) wad)
    )
    |> Seq.toArray

  let columns =
    columnIndexes
    |> Array.map(fun columnOffset ->
      // TODO: make this part of the fold - i.e. do not mutate the column array
      let column = Array.create height -1
      Seq.initInfinite id
      |> Seq.scan(fun (postOffset,shouldContinue) _ ->
        let row = wad[postOffset] |> int
        if row = 0xFF then
          (postOffset,false)
        else
          let postHeight = wad[postOffset+1] |> int
          {0..postHeight-1}
          |> Seq.iter(fun postIndex ->
            column[row+postIndex] <- wad[postOffset+3+postIndex] |> int
          )
          // the offset moves on by the row byte, the height byte, a dummy byte before the pixels, a dummy byte after
          // the pixels and the number of pixels in the post (postHeight)
          (postOffset+4+postHeight,shouldContinue)
      ) (columnOffset,true)
      |> Seq.takeWhile snd
      |> Seq.toList
      |> ignore

      column
    )

  { Width = width
    Height = height
    Left = left
    Top = top
    Columns = columns
  }
Ok. Now we can render things!
Rendering the sprite
Having unpacked the sprite from the WAD file and set up our overarching renderer actually rendering the sprite to the screen is pretty simple:
let renderDoomImage (x,y) scale (screen:FSharpDoom.Image.Image) (palette:Palette) (sprite:DoomImage) =
  use screenPtr = fixed screen.Data
  {0..sprite.Width-1}
  |> Seq.iter(fun spriteX ->
    //let column = sprite.Columns[spriteX]
    let columnPtr = fixed sprite.Columns[spriteX]
    {0..sprite.Height-1}
    |> Seq.iter(fun spriteY ->
      let srcColorIndex = NativePtr.get columnPtr spriteY
      match srcColorIndex with
      | -1 -> ()
      | _ ->
        let color = palette.Colors[srcColorIndex]
        let screenX = spriteX*scale + x
        let screenY = spriteY*scale + y
        {screenX..screenX+scale-1}
        |> Seq.iter(fun outX ->
          {screenY..screenY+scale-1}
          |> Seq.iter(fun outY ->
            NativePtr.set screenPtr (outY*screen.Width+outX) color
          )
        )
    )
  )
I’m using NativePtr here, rather than array indexers, as their is a significantly large enough performance difference between them to make it worthwhile.
In any case, if we run this, we can now see the rather famous Doom title screen:
Next Steps
Goodness knows! I’ve not thought that far ahead. Possibly load the wall textures and then move on to loading the map.
If you want to discuss this or have any questions then the best place is on GitHub. I’m only really using Twitter to post updates to my blog these days.