I’ve used the game engine itself to show how raycasting works and you can find the upload for this part here.
The principle
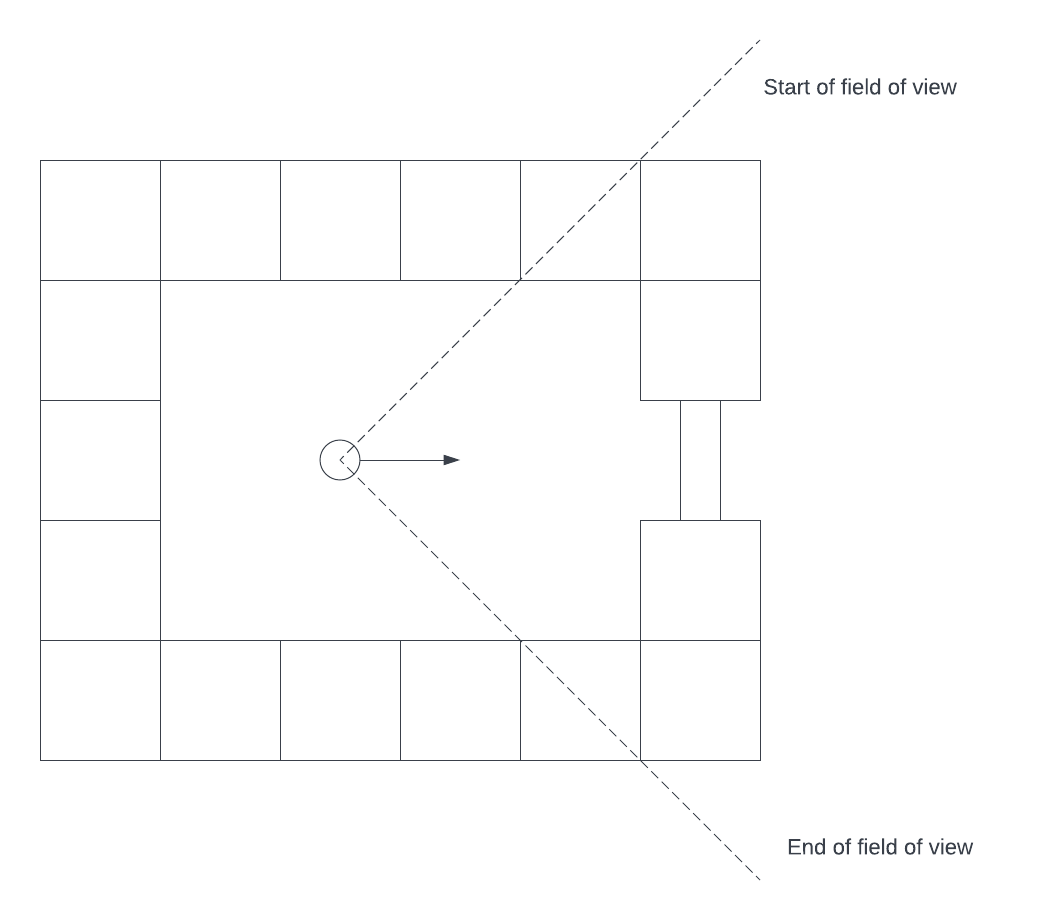
Simplistically a raycaster works by casting a ray across the map for every column on our viewport looking for collisions with walls. The leftmost column represents the start of our field of view and the last (rightmost) column represents the end of our field of view. The diagram below shows the starting room of the first level in Wolfenstein with the player facing the door and their field of view.
To help visualise this I’ve built a special mode into the game engine that will show things in action. You can access this by pressing the T key at any point and you will be able to see the scene being rendered as the ray sweeps round. It looks like this:
So how do we cast the ray and detect the wall collision? The obvious option would be to break it into a small series of steps and walk along it until we hit a wall but unless we make the steps essentially infinitely small their is always a danger that this happens:
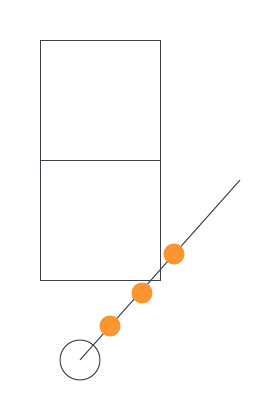
The spacing for our ray hit tests are too large and have missed the edge of the wall.
We could make the steps so small that possibly it would be a very rare visual glitch but by that point, if you consider the full scene, we are taking thousands and thousands of steps per frame and Wolfenstein ran on 1992 hardware.
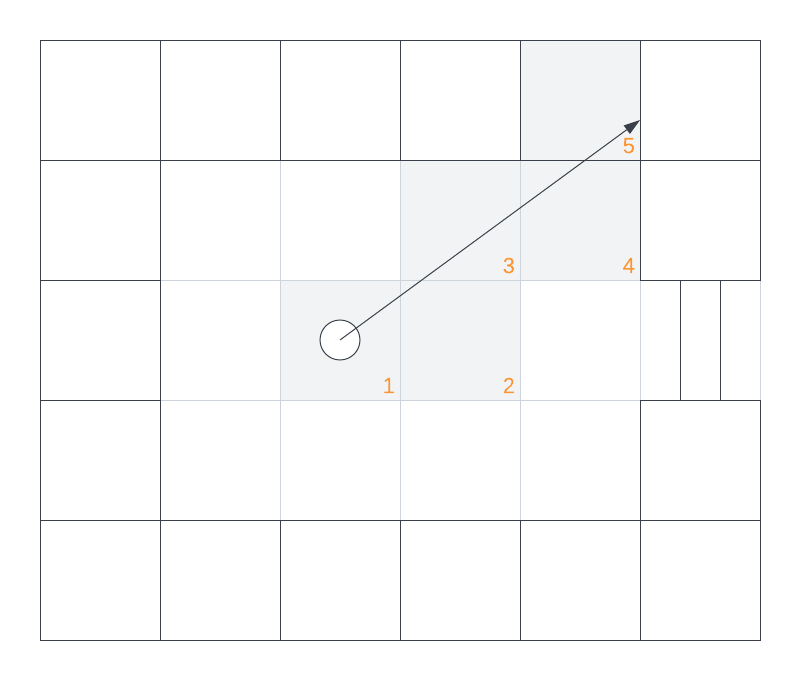
Fortunately if we consider the layout of the map - its a grid, squares of uniform size - then we can think about casting the ray as drawing a low resolution line:
Unsurprisingly their are a good number of algorithms for drawing lines like this and we can use the Digital Differential Analysis algorithm to do this. If we take this approach we can fairly cheaply look for a collision with a ray blocking map cell and then, once per ray, figure out where on the wall it intersects to use the appropriate texture.
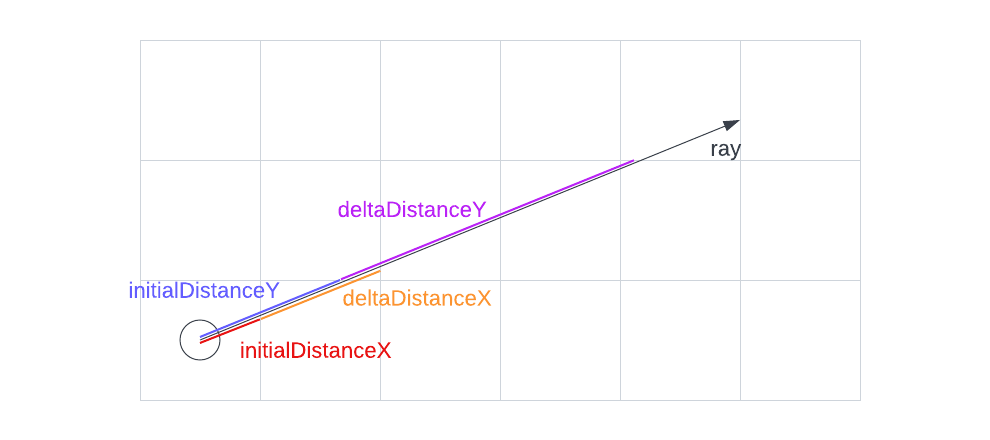
DDA basically works through ratios - from your current position you take the distance to the first horizontal grid line and the distance to the first vertical grid line. Then from those points you take the distance to the next horizontal and vertical grid lines:
Now with those starting values you basically loop with the following pseudocode:
mapX = player.x
mapY = player.Y
totalDistanceX = initialDistanceX
totalDistanceY = initialDistanceY
while not hit a wall
    if totalDistanceX is less than totalDistanceY then
        totalDistanceX = totalDistanceX + deltaDistanceX
        mapX = mapX + 1 (assume we are moving to the right, -1 if left)
    else
        totalDistanceY = totalDistanceY + deltaDistanceY
        mapY = mapY - 1 (assume we are moving up, +1 if down)
Again I’ve implemented this in the engine so you can see it work on the Wolfenstein map. Press T to activate the scene renderer and then press SPACE to watch the map being walked. You can see this in the video below:
If you hit a door their is a further step you need to take - essentially doors are a thin line running horizontally or vertically through the middle of a tile and so our grid detection falls foul. It knows if we’ve hit a door map cell but not if our ray has actually hit the door - a particular problem if the door is opening or closing in which case the ray needs to pass through it. To detect the door hit you basically need to take a “half step” further down the ray. They are, basically, a special case.
And in practice!
I’m not going to pretend this code is particularly elegant right now. Something that was fairly functional to begin with has got pulled all over the place to account for me wanting to show the ray casting in a step by step fashion. At the moment I’m basically ploughing onwards, getting more of a feel for functional stuff in C#, with a view to come back and look again at things based on my learnings and findings.
In any case the ray caster itself is fairly simple and is basically an expression of the pseudocode above:
public override RayCastResult Cast(GameState game, RayCastParameters parameters,
        Func<RayCastResult, bool> shouldContinueFunc)
{
    var (initialMapX, initialMapY) = parameters.From.ToMap();
    var deltaDistX = parameters.Direction.X == 0.0 ? double.MaxValue : Math.Abs(1.0 / parameters.Direction.X);
    var deltaDistY = parameters.Direction.Y == 0.0 ? double.MaxValue : Math.Abs(1.0 / parameters.Direction.Y);
    var (stepX, initialSideDistX) =
        parameters.Direction.X < 0.0
            ? (-1, (parameters.From.X - initialMapX) * deltaDistX)
            : (1, (initialMapX + 1.0 - parameters.From.X) * deltaDistX);
    var (stepY, initialSideDistY) =
        parameters.Direction.Y < 0.0
            ? (-1, (parameters.From.Y - initialMapY) * deltaDistY)
            : (1, (initialMapY + 1.0 - parameters.From.Y) * deltaDistY);

    // TODO: the use of raycastresult like this is a dogs dinner at the moment but will get things going for now
    var result = new RayCastResult(
        IsComplete: false,
        IsHit: false,
        DeltaDistance: (deltaDistX, deltaDistY),
        TotalSideDistance: (initialSideDistX, initialSideDistY),
        MapHit: (initialMapX, initialMapY),
        initialSideDistX < initialSideDistY ? Side.NorthSouth : Side.EastWest
    );
    while (shouldContinueFunc(result))
    {
        var (newMapX, newMapY, newSide, newSideDistX, newSideDistY) =
            result.TotalSideDistance.x < result.TotalSideDistance.y
                ? (result.MapHit.x + stepX, result.MapHit.y, Side.NorthSouth, result.TotalSideDistance.x + deltaDistX, result.TotalSideDistance.y)
                : (result.MapHit.x, result.MapHit.y + stepY, Side.EastWest, result.TotalSideDistance.x, result.TotalSideDistance.y + deltaDistY);
        var newIsHit = game.Map[newMapY][newMapX] switch
        {
            TurningPoint => parameters.IncludeTurningPoints,
            Empty => false,
            Wall => true,
            Door door => IsDoorHit(
                (stepX,stepY),
                parameters,
                (newMapX,newMapY),
                newSide,
                game.Doors[door.DoorIndex]
            ),
            _ => false
        };
        result = new RayCastResult(
            IsComplete: false,
            IsHit: newIsHit,
            DeltaDistance: (deltaDistX, deltaDistY),
            TotalSideDistance: (newSideDistX, newSideDistY),
            MapHit: (newMapX, newMapY),
            Side: newSide
        );
    }

    return result with { IsComplete = true };
}
Slightly more complicated than when it started out as I wanted to make the ray caster and my step by step ray caster interchangeable but hopefully based on what we outlined above this makes at least a degree of sense. We’re going to make use of this caster in multiple contexts some of which will have different casting termination / “hit” rules which is why it takes a function determining if the cast should continue. In fact it turns out the caster is very useful!
At the moment the ray caster is, however, only used by our wall renderer which essentially walks column by column across our viewport calculating a ray direction for each column from the players position and taking into account the field of view. This is fairly standard camera / plane vector maths so I’m not going to expand on it here suffice to note one important point that can catch you out.
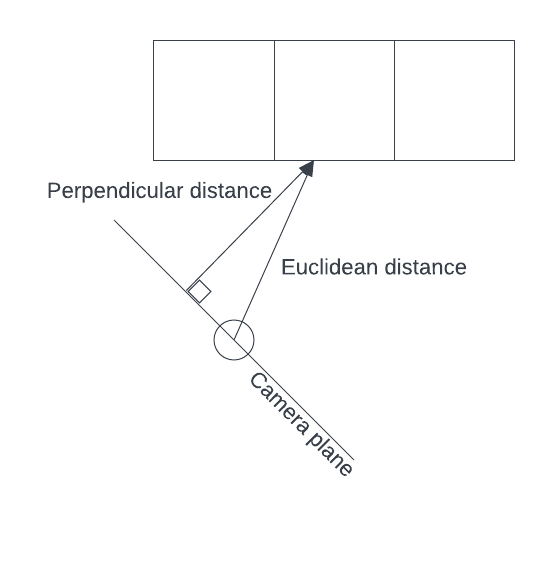
The heights of the walls that are rendered are based on their distance from the player. The further away the player is from the wall the smaller the column that is drawn. Makes sense right. However - if you use the direct euclidean distance from the player to the location of the hit on the wall you will end up with a fish eye view of the world. When I first had a go at a raycaster back in the 90s I never could quite figure out what was going on here. To eliminate the fisheye view you need to use the perpendicular distance from the camera plane to the wall:
And finally on drawing textures - pretty simple really. We simply pull out the appropriate column and render it scaled at the required height in our frame buffer:
unsafe void RenderTextureColumn(double lineHeight, double startY, int textureIndex, double endY, double textureX,
    uint* destPtr, int viewportX)
{
    var step = 1.0 * Constants.TextureHeight / lineHeight;
    var texturePosition = (startY - viewportSize.height / 2.0 + lineHeight / 2.0) * step;
    var texture = assetPack.Walls[textureIndex];
    fixed (uint* baseTexturePtr = texture.Pixels)
    {
        for (int drawY = 0; drawY < (endY - startY); drawY++)
        {
            var textureY = (int) (texturePosition + step * drawY) & ((int) Constants.TextureHeight - 1);
            var color = *(baseTexturePtr + textureY * texture.Width + (int) textureX);
            *(destPtr + (drawY + (int) startY) * viewportSize.width + viewportX) = color;
        }
    }
}
Credits
I’m not going to pretend I figured this out from first principles. I looked in the code of the original Wolfenstein and a couple of online raycasters some of which took the “small steps” approach I knew didn’t work well. Eventually I came across this excellent article which mostly nailed it for me. The thing it was really missing from a comprehension point of view, for me at least, was the idea that I was drawing a low resolution line like I might back on the 8-bits. Once I’d thought of it in those terms it all became pretty obvious and so hopefully my explanation above is useful to others. As ever I stand upon the shoulders of giants!
If you want to discuss this or have any questions then the best place is on GitHub. I’m only really using Twitter to post updates to my blog these days.